Docker, Kubernetes and everything else related to containers are gaining every day more traction and after a somewhat slow start this seems to be “the next big thing” and everybody is rushing to support it. Microsoft, a late adopter, is now throwing everything it has to it while Red Hat and Google already have a solid offerings with OpenShift and GKE.
On a smaller scale I’m using plain Docker “in production” on my VPS since 2015 and it really changes your workflow, thus making really easy having multiple applications running on the same VPS without interferences. At first it’s quite painful but once that everything runs smoothly your continuous deployment pipeline works like a charm and you don’t have to worry about strange interactions caused by sharing the same OS.
The step up from Docker is using it with an orchestrator to manage multiple nodes. I used my MSDN Azure credits to try Docker Swarm, OpenShift Origin and Kubernetes but I always felt that something was missing: it works, it works great but you can’t really understand what’s going on under the hood. At the Voxxed Lugano I watched Nicola Ferraro’s presentation on OpenShift (a must see if you haven’t seen it) and he was talking about, among other things, about a Raspberry Pi cluster. That’s when something clicked in my mind and I decided to build my own following a couple of very well done tutorials that I found around.
Buying the components
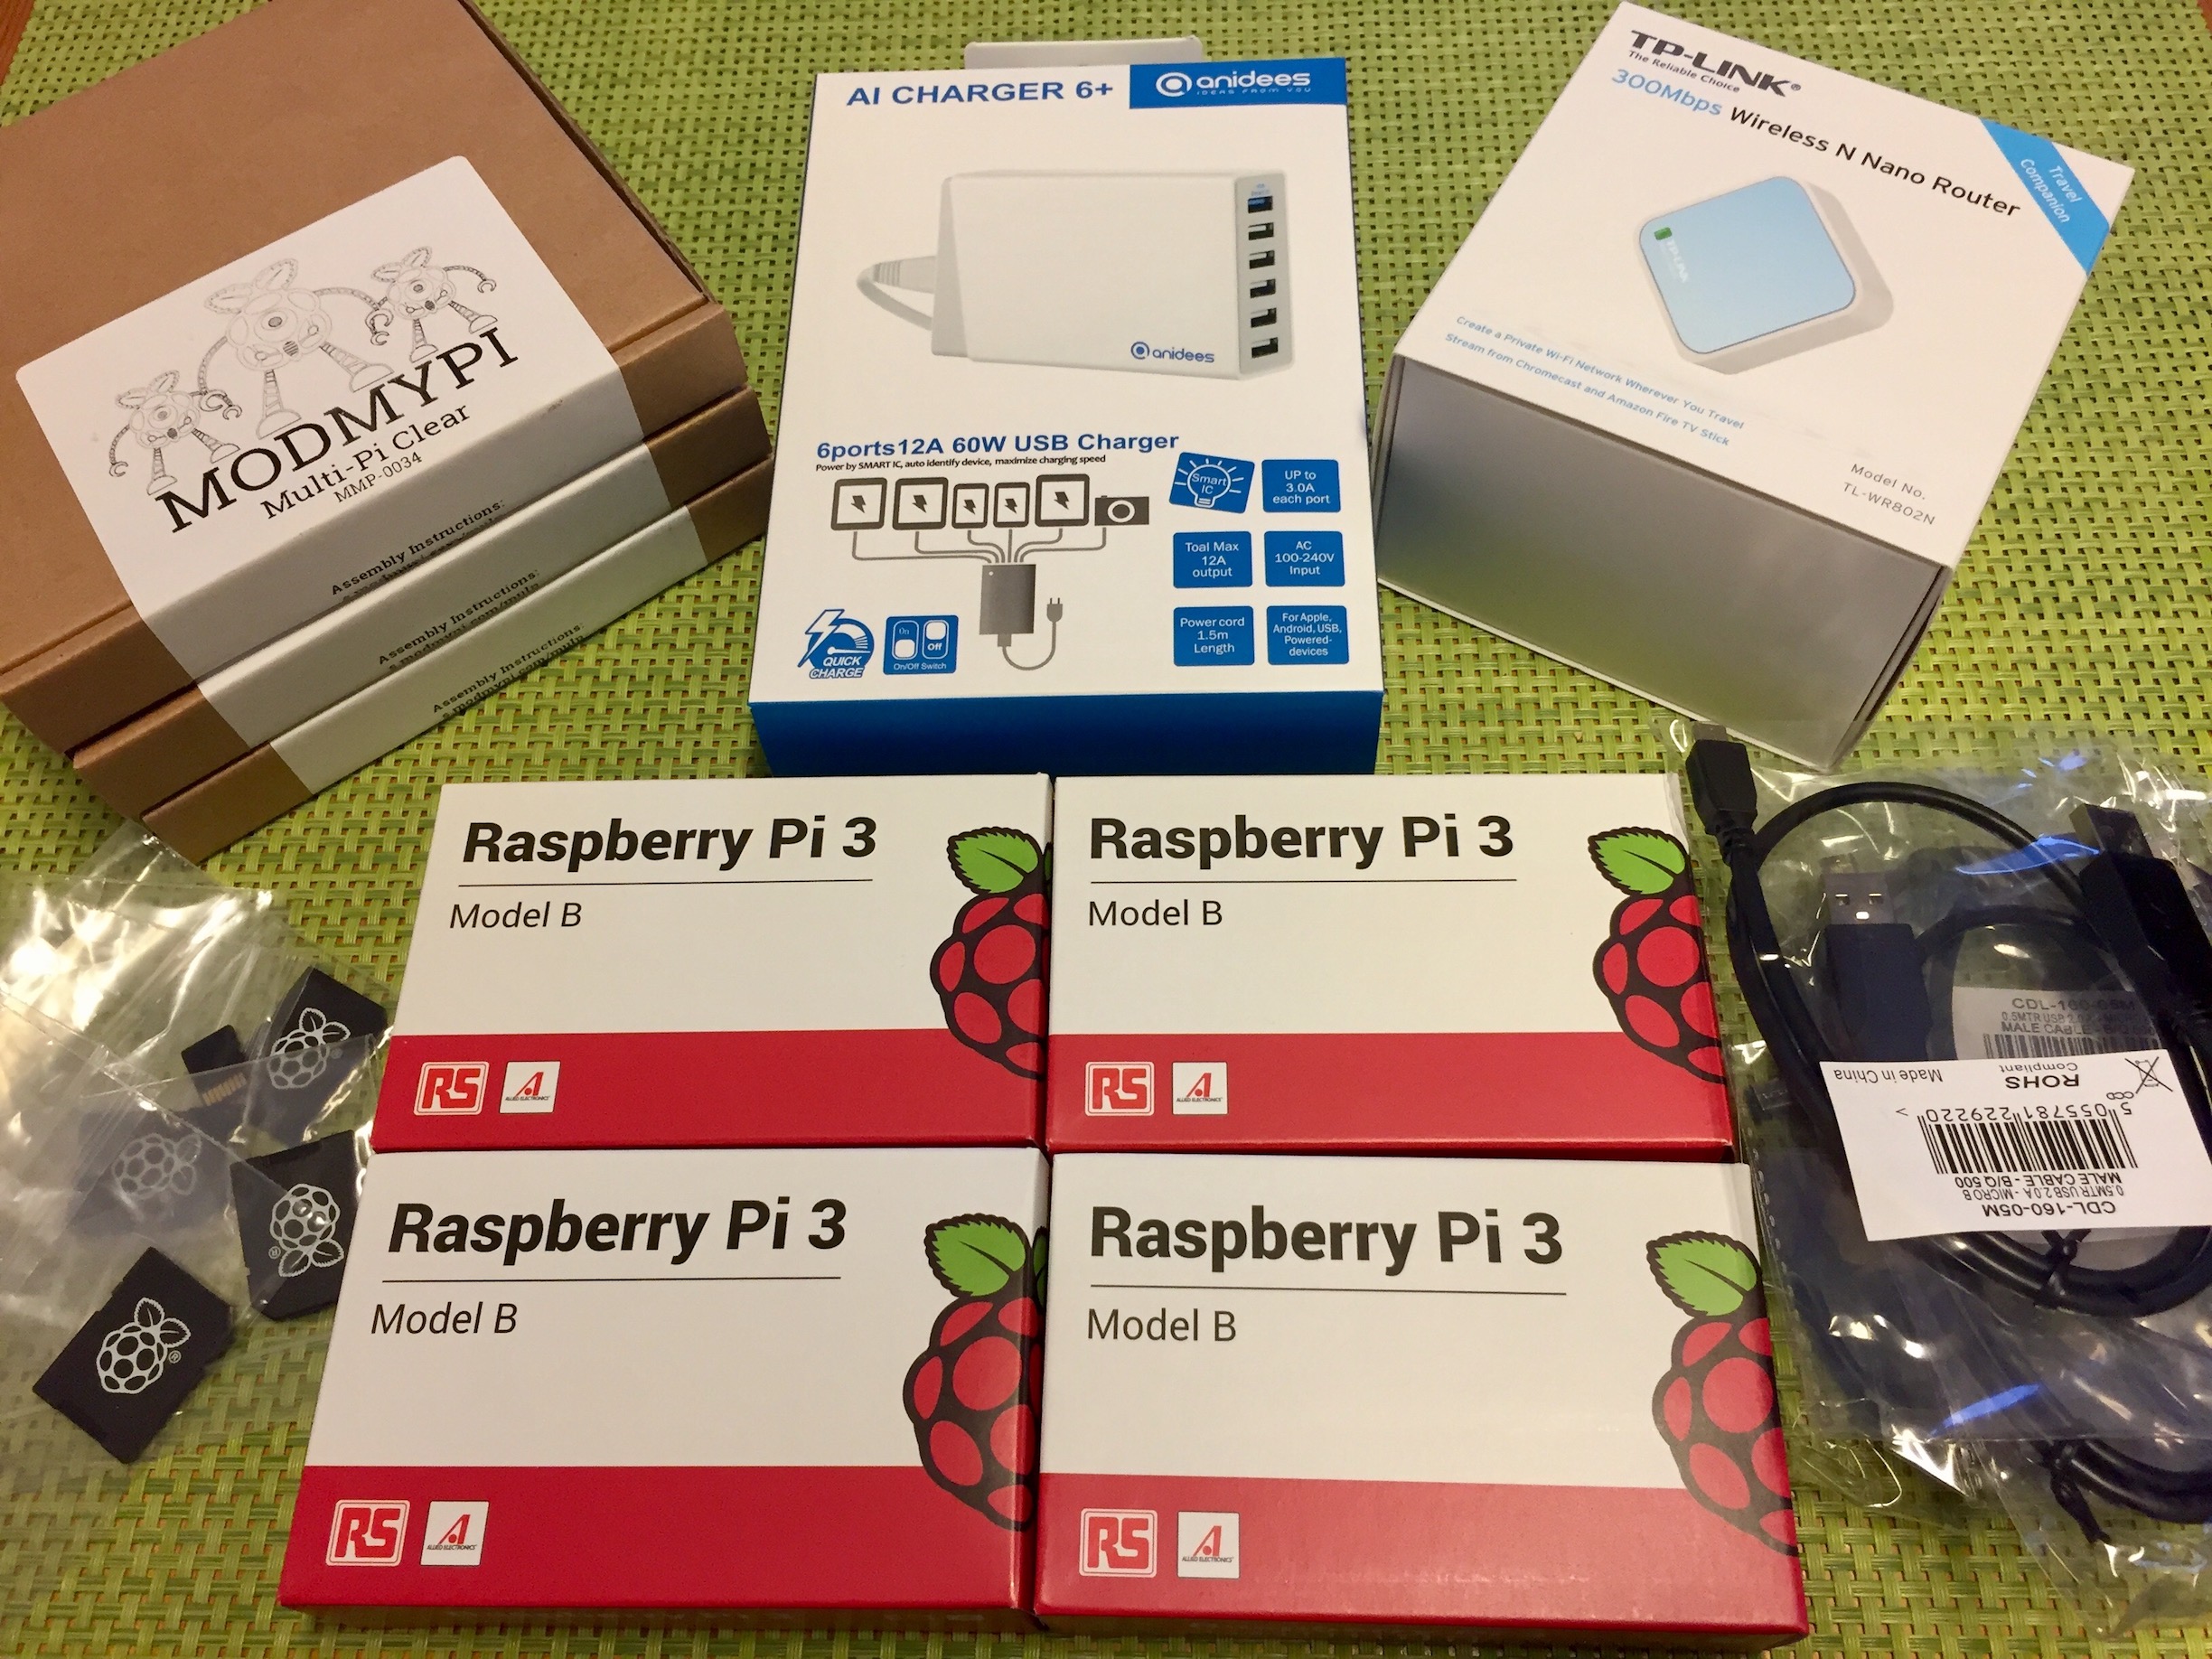
The first step is to get the components and I bought everything from ModMyPi because they have a huge stock at fair prices, the only thing that they don’t sell is the Wi-Fi router but it’s sold by Amazon so it’s even easier to get.
This was my shopping list:
| Product | Quantity | Price (EUR) | Total (EUR) |
|---|---|---|---|
| Anidées 6 Port 60W High Power USB Hub | 1x | 36.16 | 36.16 |
| Raspberry Pi 3 - Model B & 32GB MicroSD Card Bundle | 4x | 44 .43 | 177.72 |
| Multi-Pi Stackable Raspberry Pi Case | 3x | 13.38 | 40.14 |
| USB to Micro USB Cable 0.5m | 5x | 1.55 | 7.75 |
| TP-Link TL-WR802N N300 WLAN Nano Router | 1x | 25.83 | 25.83 |
| TOTAL | 287.60 |
This may seem a bit expensive for an experiment but at 71.90 EUR per node I think that there isn’t a cheaper alternative to play with Kubernetes at that level. There is also something fun that I can describe as a “LEGO experience” when you follow the instructions and install Kubernetes.
Assemble the cluster
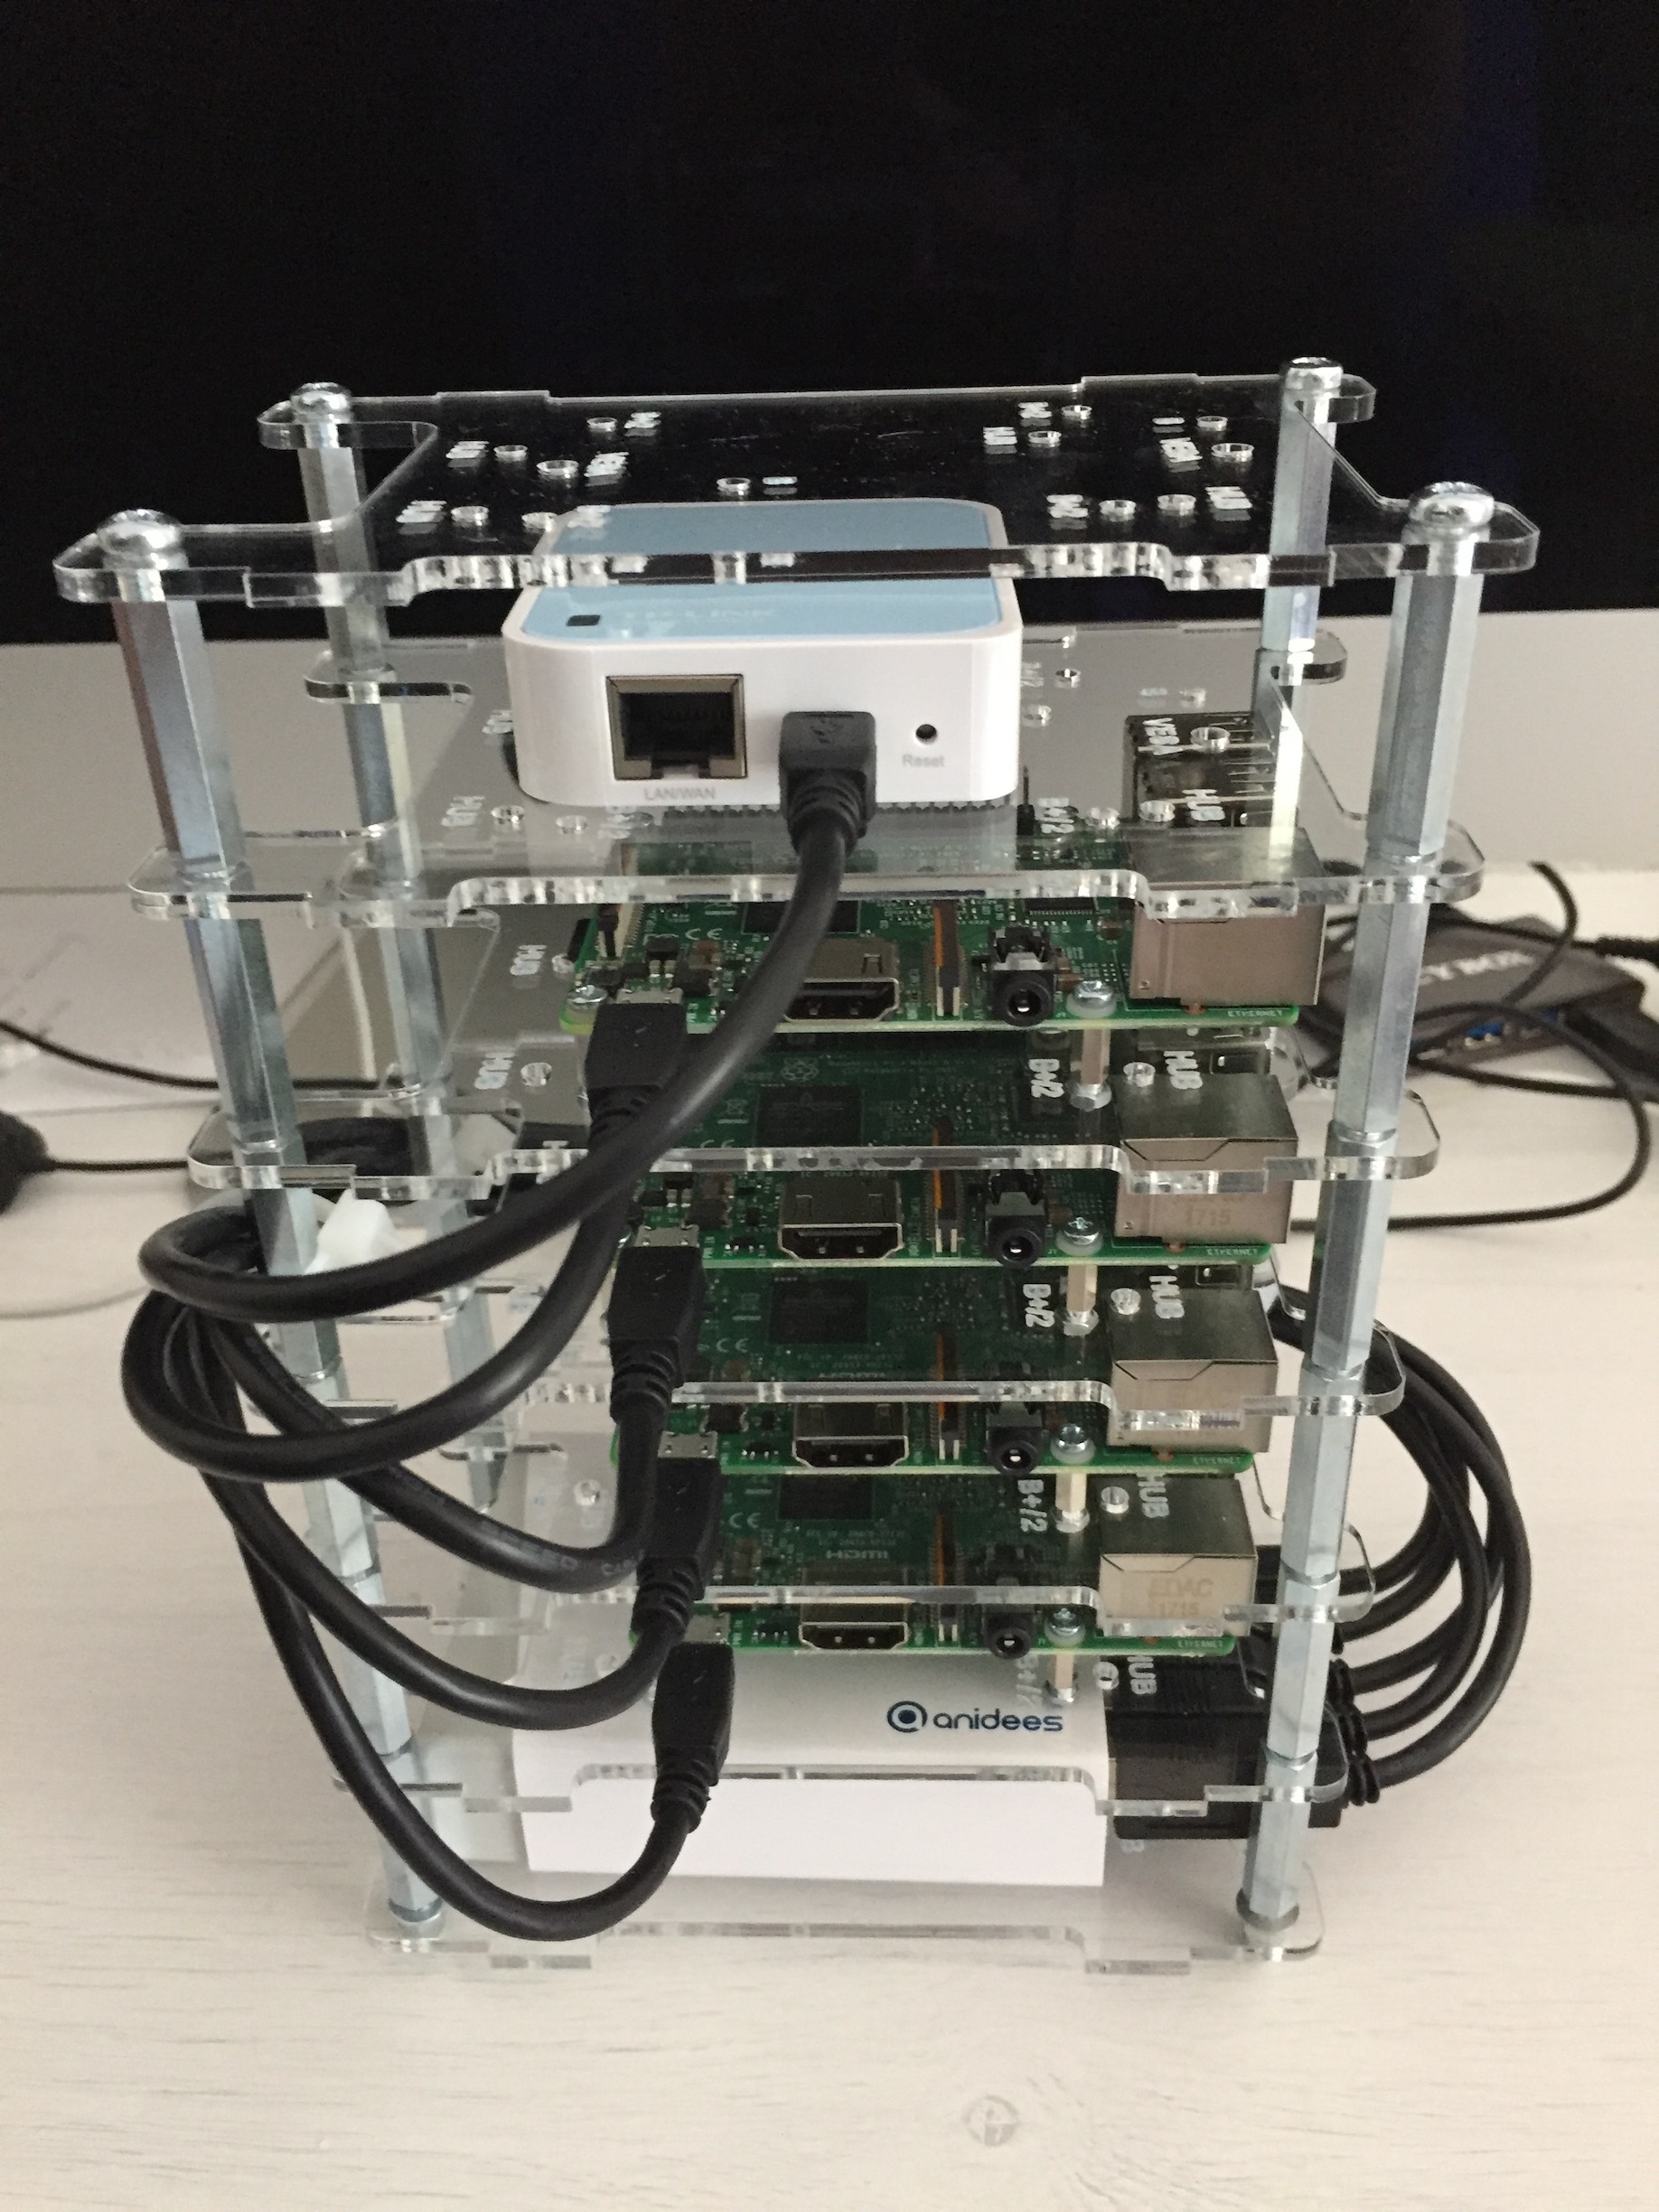
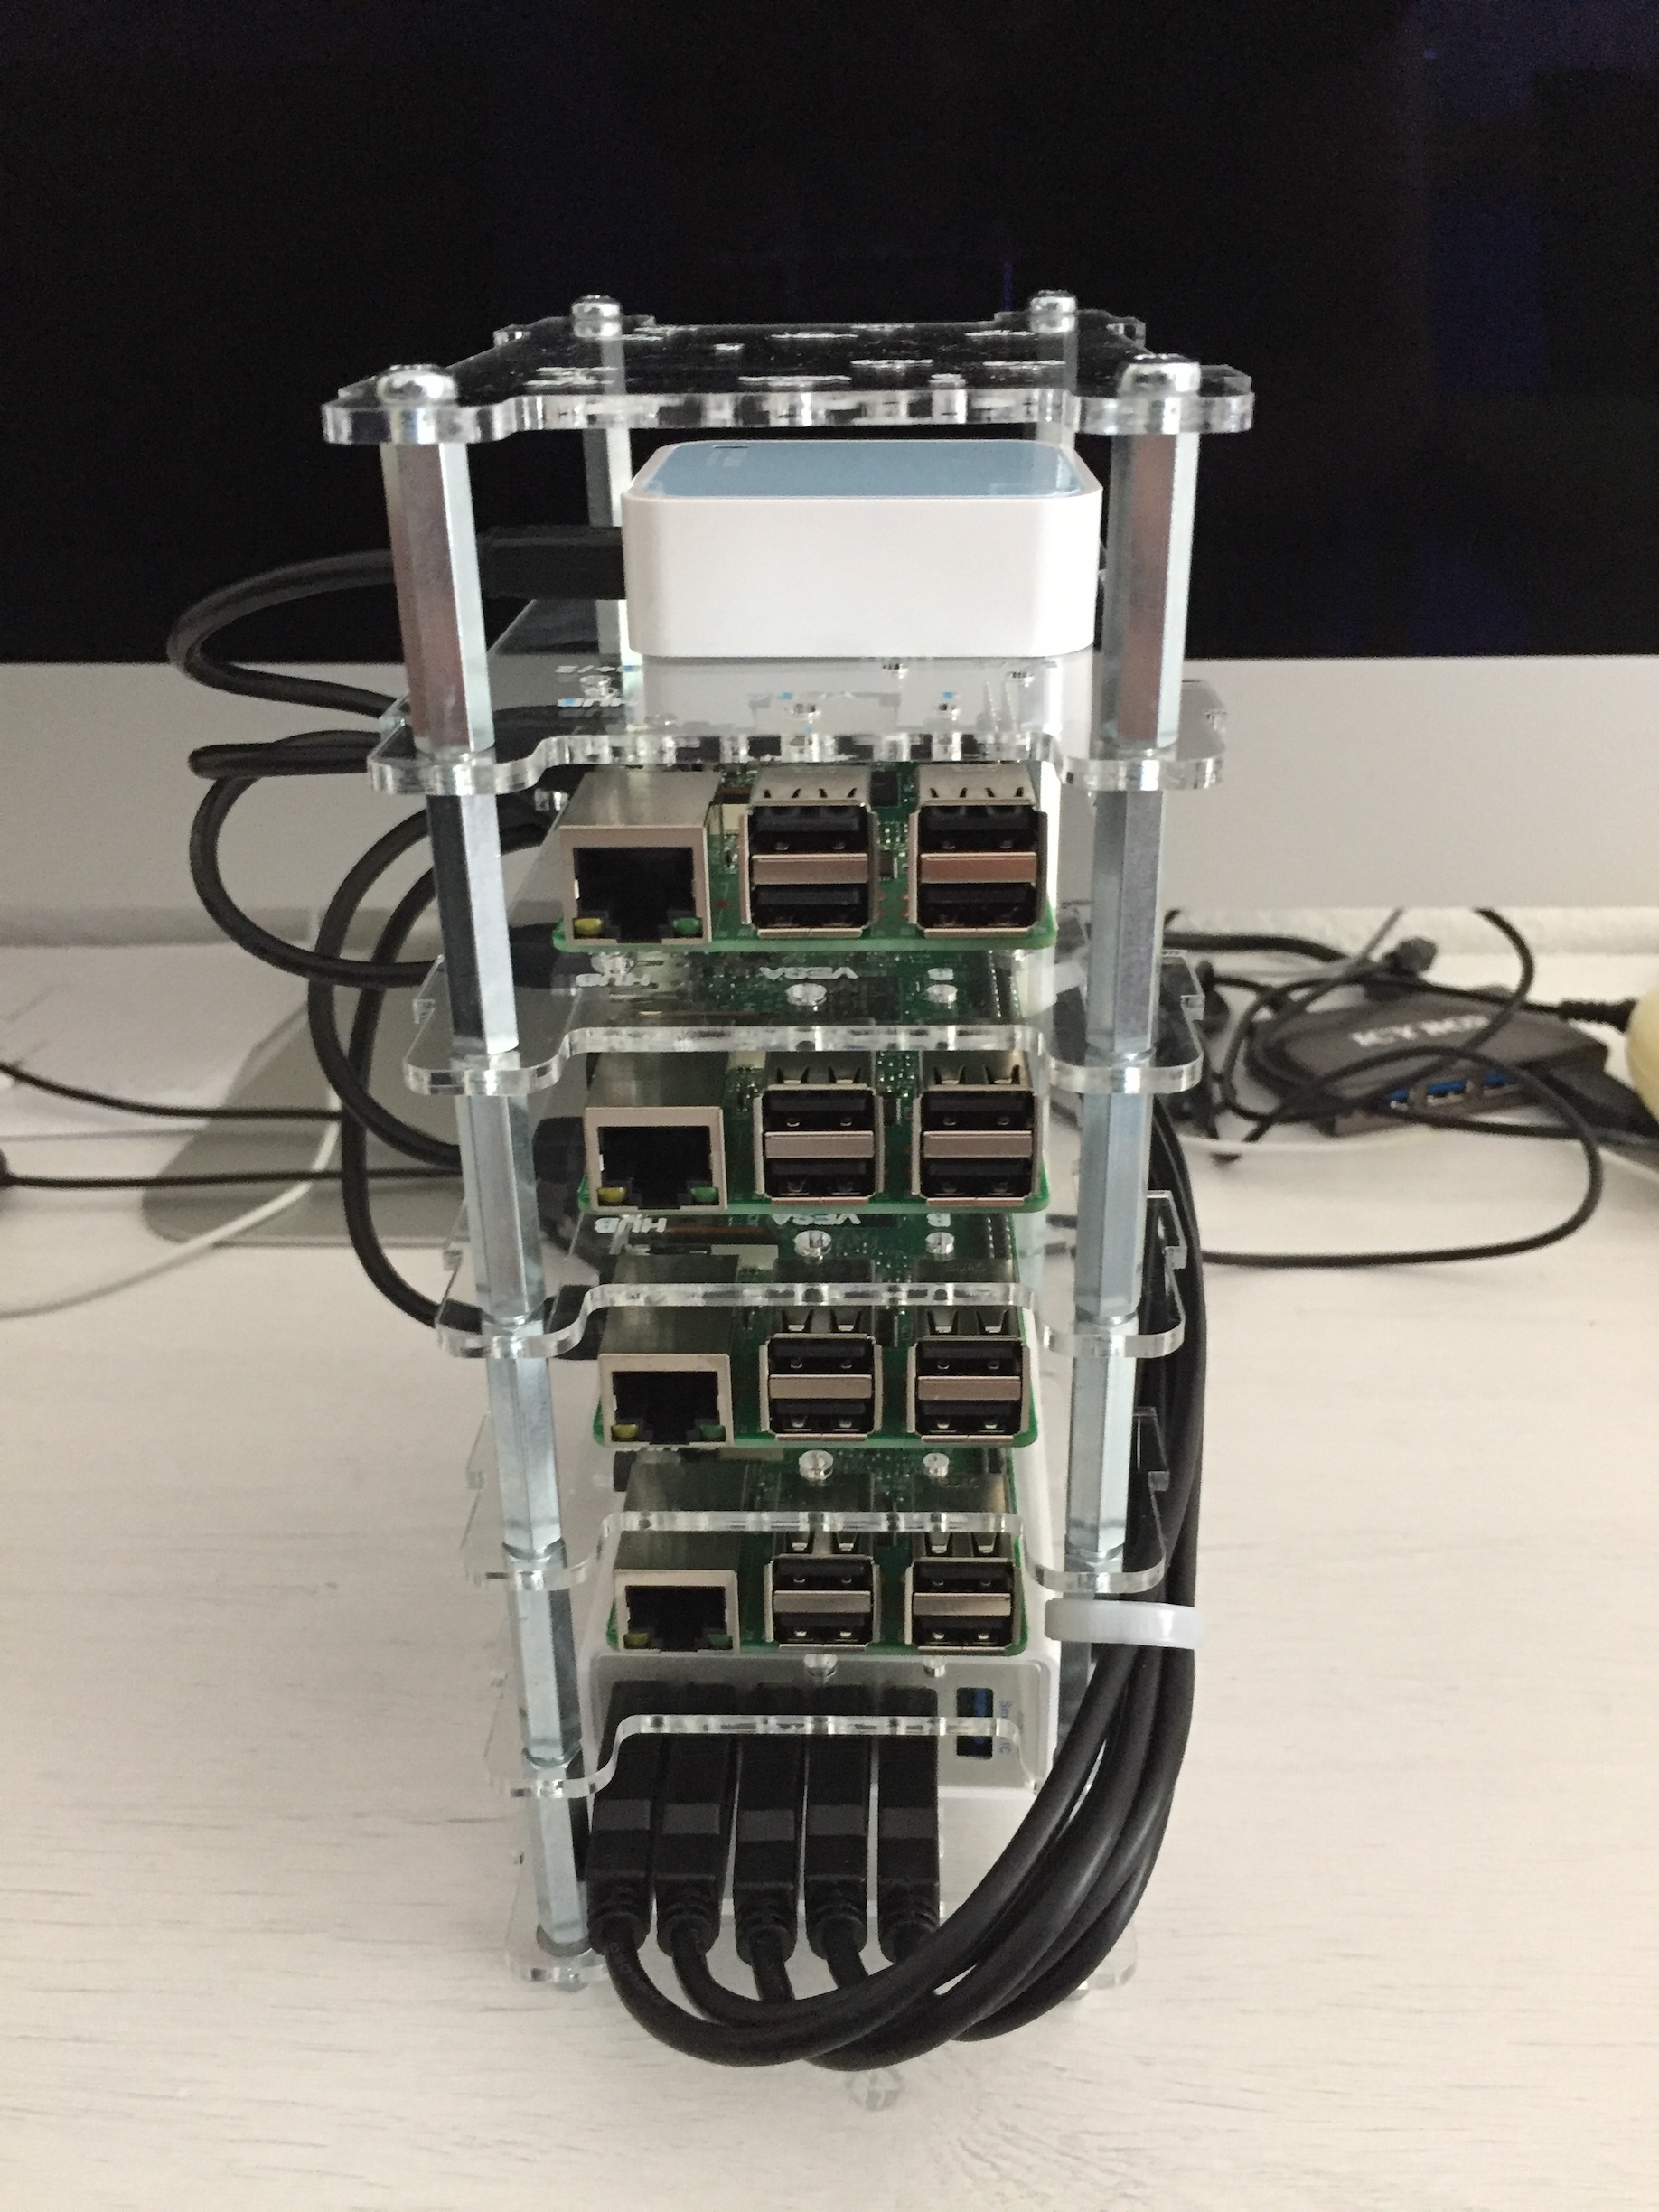
Assembling the cluster is very straightforward, just remember to always align correctly the boards with the stackable case and in less than 30 minutes you should be ready to deploy the software. As you can see I put the Power Hub at the bottom, the 4 Raspberry Pi’s and the Wi-Fi router on the top. The router’s purpose is to provide connectivity to the Raspberries and at the same time connect to an “upstream” router so it can relay also an internet connection. I found very helpful the articles written by Roland Huß to automate the deployment with Ansible (Project31/ansible-kubernetes-openshift-pi3) and Sergio Sisternes for providing a guide on how to setup the WiFi router (Recipe – Kubernetes cluster with Raspberry Pi 3).
The final result should look like this:

Setup the hardware
Most of the installation is automated by using Ansible. Thanks to Hypriot images a complete headless setup is possible.
- Download the latest Hypriots image and store it as
hypriot.zip:curl -L https://github.com/hypriot/image-builder-rpi/releases/download/v1.5.0/hypriotos-rpi-v1.5.0.img.zip -
Install Hypriot’s flash installer script. Follow the directions on the installation page.
- Insert you Micro-SD card in your Desktop computer (via an adapter possibly) and run
flash --hostname n1 --ssid "mysid" --password "secret" hypriotos-rpi-v1.5.0.img.zipYou will be asked to which device to write. Check this carefully, otherwise you could destroy your Desktop OS if selecting the the wrong device. Typically its something like
/dev/disk2on OS X, but depends on the number of hard drives you have. - Repeat step 2. to 3. for each Micro SD card. Please adapt the hostname before each round to n2, n3, n4.
Configure the network
It is now time to configure your WLAN router. This of course depends on which router you use. The following instructions are based on a TP-Link TL-WR802N which is quite inexpensive but still absolutely ok for our purposes since it sits very close to the cluster and my notebook anyway.
First of all you need to setup the SSID and password. Use the same credentials with which you have configured your images.
The addresses I have chosen are:
| IP | Device |
|---|---|
192.168.23.1 |
WLAN Router |
192.168.23.181 … 192.168.23.184 |
Raspberry Pis |
You should be able to SSH into every Pi with user pirate and password hypriot. Internet access from the nodes is mandatory for setting up the nodes with Ansible.
After that you checked every Raspberry you can configure the router using these steps detailed by Sergio Sisternes:
- Go to DHCP > Client list and take note of the MAC addresses
- Go to DHCP > Address reservation, and set a static (Reserved) IP address to each Raspberry
- Go to Quick Setup and configure the router in the hotspot mode so it can connect itself to another router and share Internet with the Raspberries
Configure the cluster using Ansible
After this initial setup is done, the next step is to initialize the base system with Ansible. You will need Ansible 2 installed on your desktop (e.g. brew install ansible when running on OS X) and a copy of my GitHub repository with the playbooks. The project is largely based on of a great repository made by Roland Huß:
Project31/ansible-kubernetes-openshift-pi3.
The project’s main features are:
- From zero to a running cluster with a single Ansible playbook
- Kubernetes 1.7
- WiFi networking and Flannel as CNI
- Cluster aware storage available out of the box using GlusterFS (replicated on every node)
- Dashboard and Heapster deployed by default along with Traefik (a reverse proxy that exposes your containers to the outside world)
- Manual deployments for the Docker registry, MySQL, whoami and Lavagna.
Ansible configuration
-
Checkout the Ansible playbooks:
git clone https://github.com/SitoCH/rpi-kubernetes-cluster.git rpi-kubernetes-cluster cd rpi-kubernetes-cluster -
Copy over
hosts.exampleand adapt it to your needscp hosts.example hosts vi hostsThere are three groups:
- pis contains all members of your cluster where one is marked as “master” in the field
host_extra. This group will be added to every node in its/etc/hosts. It is important that one host is marked as “master”, since the playbooks rely on this host alias for accessing the API server. - master IP address of the Master
- nodes All nodes which are not Master
- volumes Volumes to create on GlusterFS
- pis contains all members of your cluster where one is marked as “master” in the field
Configure the cluster
Run the deployment with the command:
ansible-playbook -k -i hosts setup.yml
Deploy default applications
Once that the cluster is up and running this playbook will deploy GlusterFS endpoints, Heapster, Dashboard and Traefik:
ansible-playbook -k -i hosts deployments.yml
Traefik
Traefik is a reverse proxy that exposes your containers to the outside world. The management dashboard is available at http://master-node:8080/
Manual deployments
For convenience useful deployments can be found in the directory manual-deployments, please note that you must install the Registry in order to use other manual deployments because the images will be centrally cached.
Registry
This container installs a Docker registry that acts as a pass-trough cache, this way only the first node will download an image from Internet and all the other requests will be served from “inside” the cluster.
kubectl --kubeconfig run/admin.conf create -f manual-deployments/registry/registry.yml
Who am I
Simple container that deploys on 3 nodes a website that prints it’s container ID.
Thanks to Traefik you can access it on http://master-node/whoami/
kubectl --kubeconfig run/admin.conf create -f manual-deployments/whoami/whoami.yml
MySQL
MySQL database server with persistent storage.
kubectl --kubeconfig run/admin.conf create -f manual-deployments/mysql/mysql.yml
Lavagna
Lavagna is an open-source issue/project management tool designed for small teams (another open source project of mine made with 2 friends).
kubectl --kubeconfig run/admin.conf create -f manual-deployments/lavagna/lavagna.yml
Conclusions
Building a real, tangible cluster from the ground up has been an amazing experience. It really helps you understand the core mechanics that are always abstracted when you deploy to a cloud provider like Azure. Just to name a few key areas that can be understood only by this “hands-on” approach:
- Storage: storage is the hardest part to get right when using containers and tinkering with GlusterFS, volumes, claims and bindings really give you a good insight.
- Container networking: another “black magic” topic, especially when working with different CNI plugins.
- Reverse proxy: Traefik helps you proxy multiple applications in an efficient way but, as usual, trying is the best way to learn.
- ARM based Docker images: nobody cares about a container’s base image because it’s usually x86, Raspberry Pi are ARM based so you have to dig deeper, find a good base image and understand how to build an ARM image on OS X.
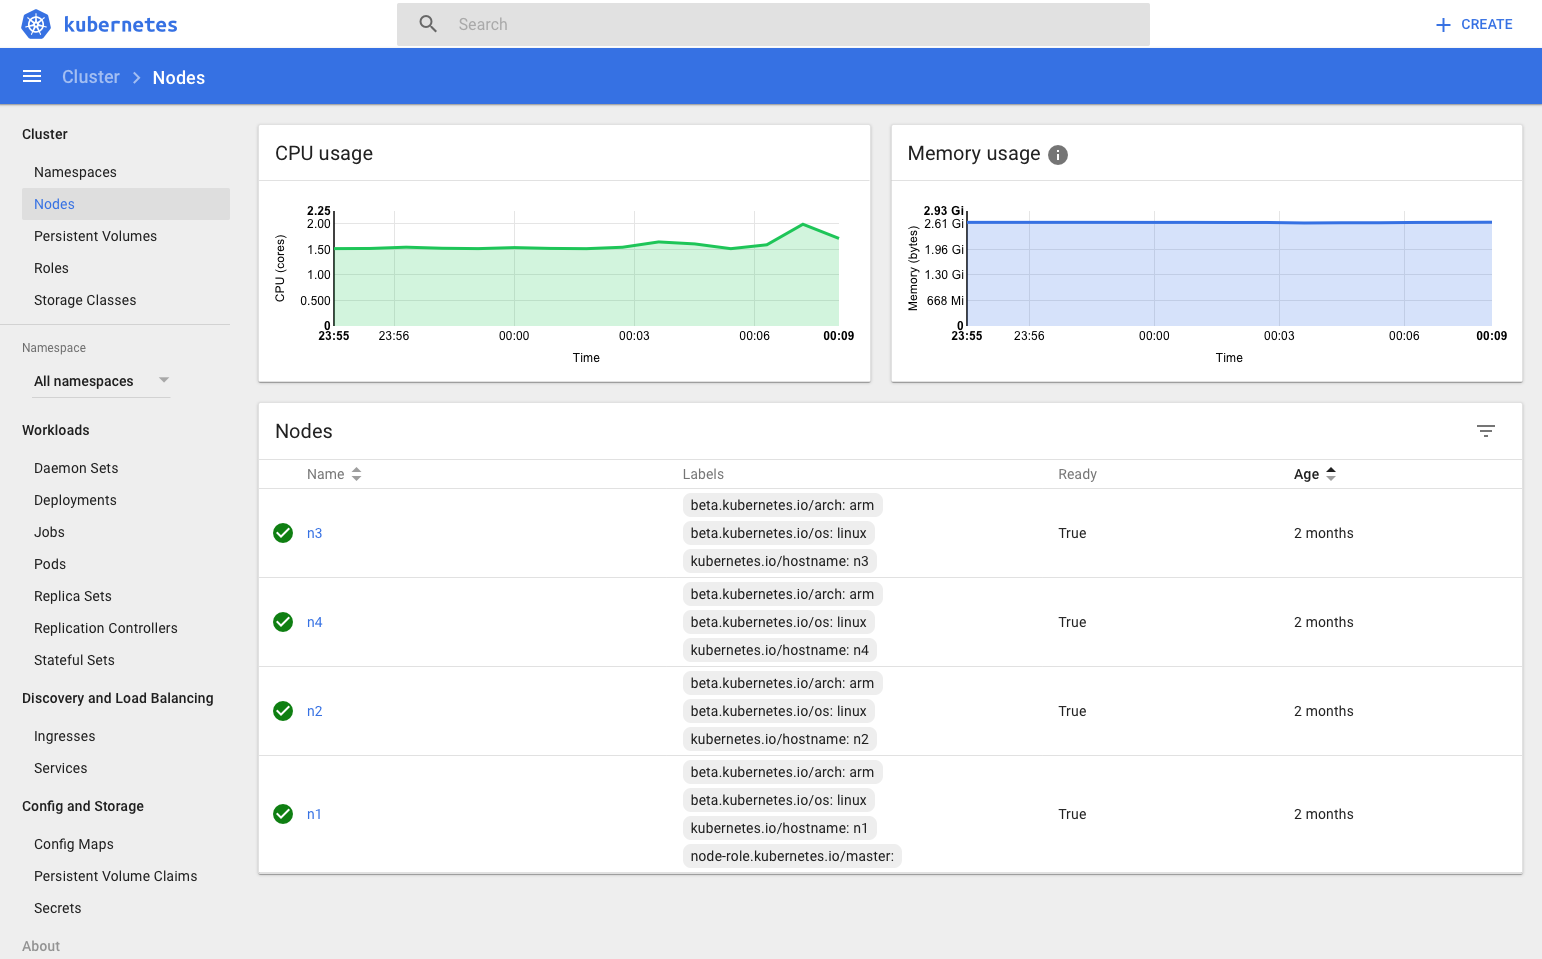
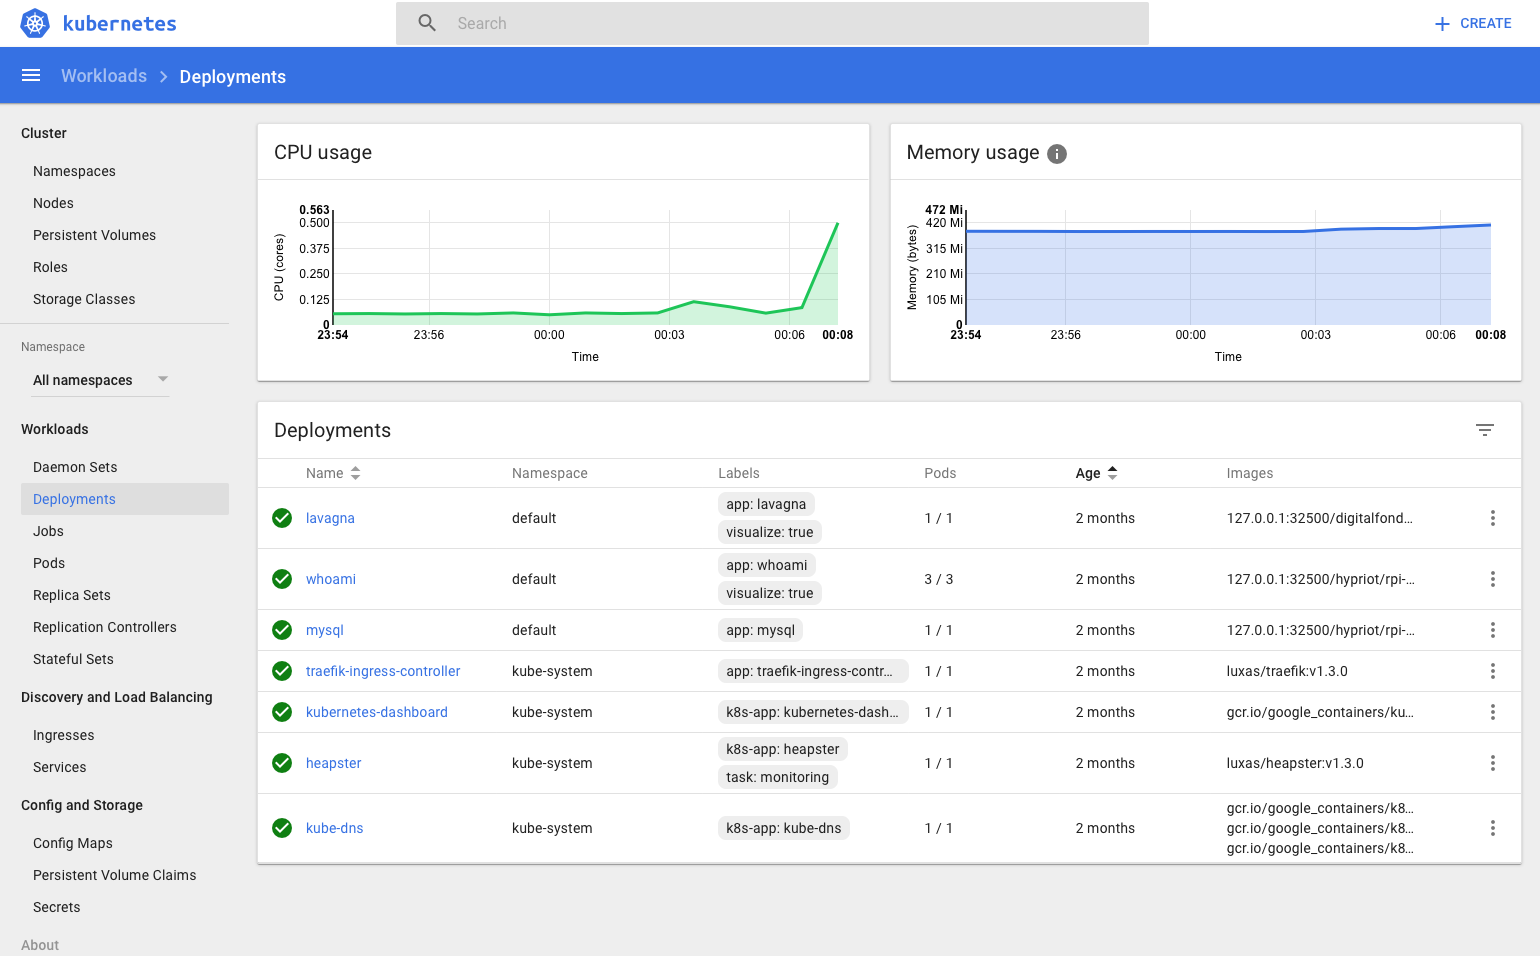
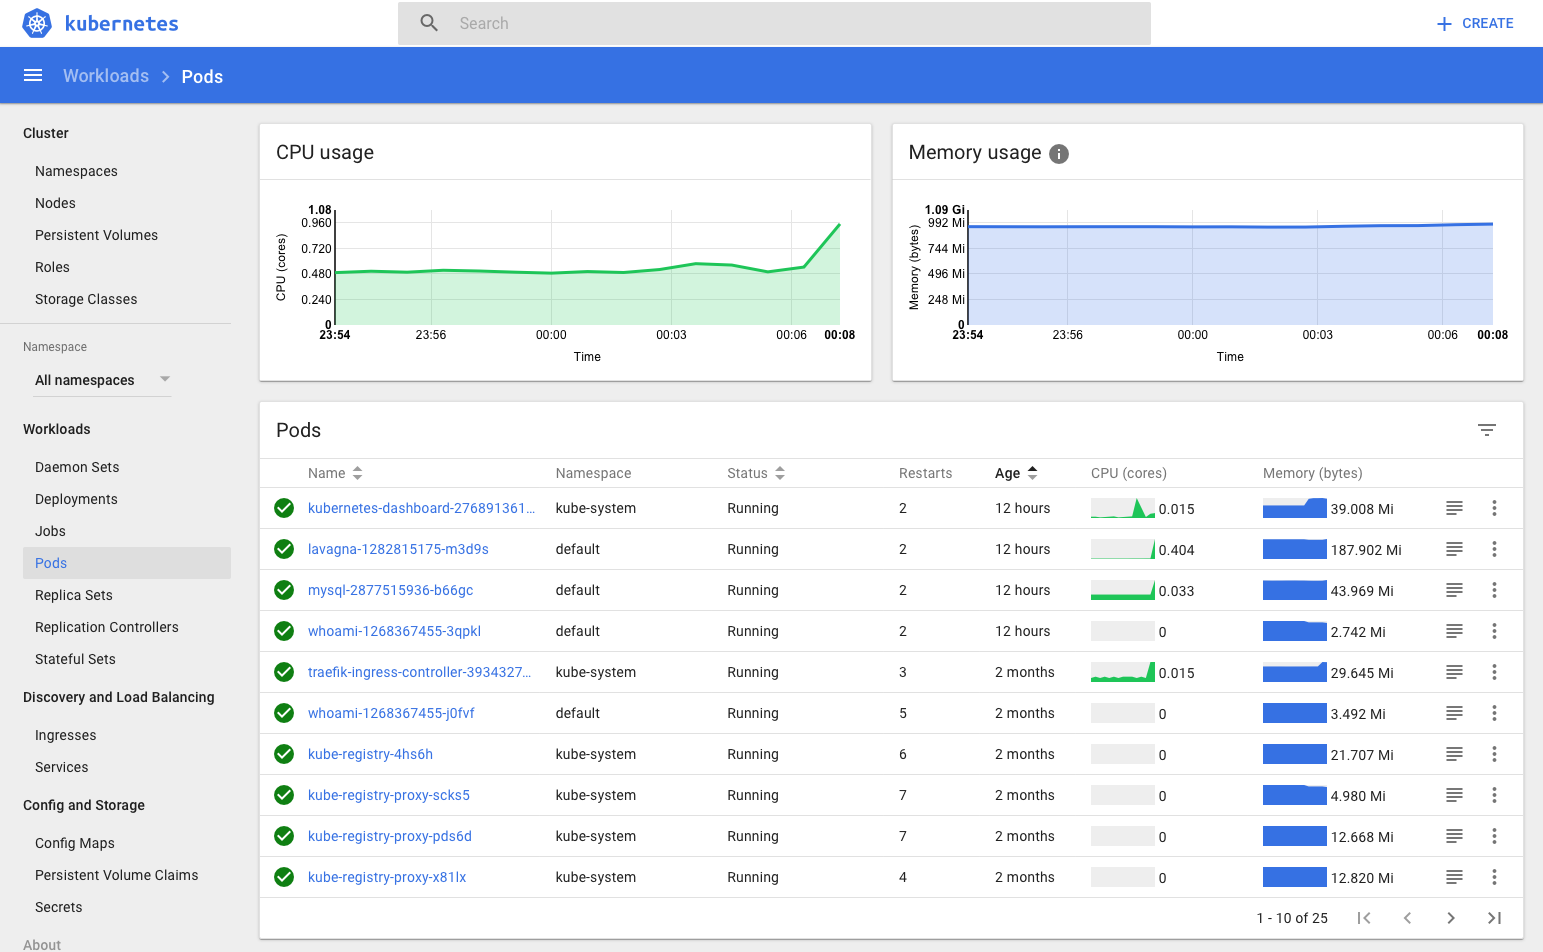
Least but not last let’s show some screenshots of the Kubernetes dashboard that prove that installing a Raspberry Pi cluster is challenging but rewarding: